How to recap a vintage amplifier or receiver
Vintage audio gear is a ticking time bomb of chemical degradation. You might have just scored a gorgeous Marantz 2270 or a powerhouse Sansui AU-717, but if that unit is still running on its original internal components, you are not hearing what the engineers intended. You are hearing the sound of aging electrolyte fluid and drifting tolerances. The most impactful restoration task you can undertake is a full “recap” - the process of replacing every electrolytic capacitor in the signal path and power supply.
Most hobbyists hesitate because they fear ruining a classic piece of history. However, leaving 50 year old capacitors in a high voltage circuit is actually the riskier move. When these components fail, they can leak corrosive fluid onto the circuit board or, worse, short out and take an irreplaceable power transformer with them. Recapping is not just about improving the sound; it is about insurance for your investment. If you want that deep, controlled bass and the sparkling high end that vintage HiFi is famous for, you have to get comfortable with a soldering iron. This is a labor of love that requires patience and precision, but the sonic reward is like peeling a thick wool blanket off your speakers.
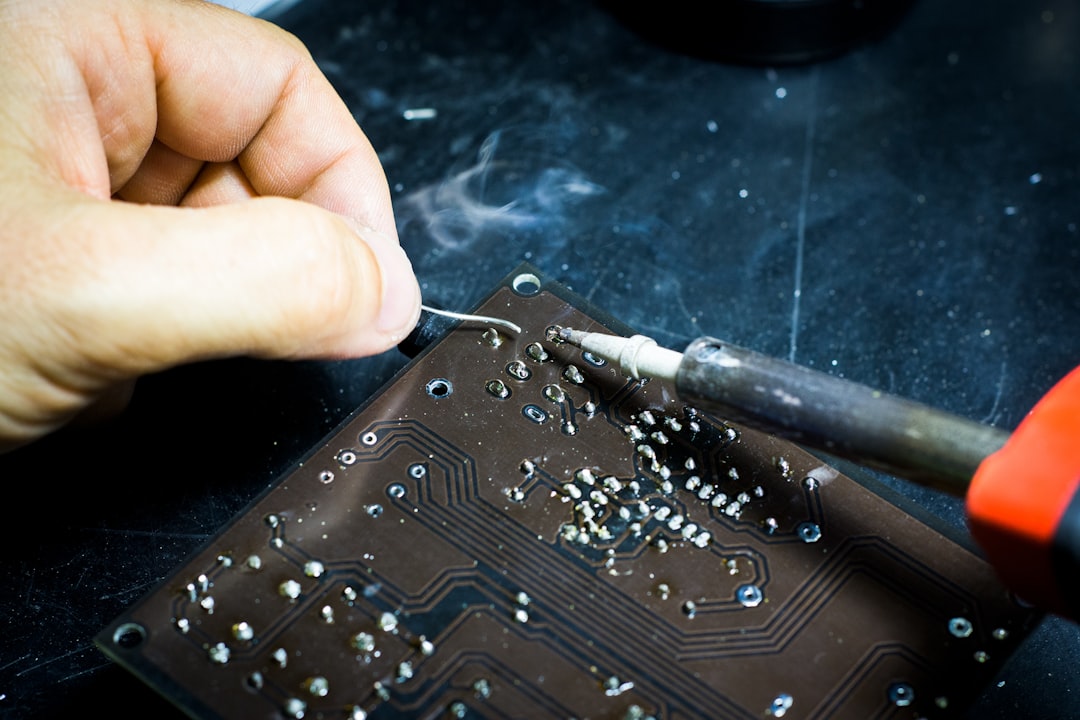
Photo by Blaz Erzetic on Unsplash
Why Vintage Capacitors Fail and What It Does to Your Sound
Electrolytic capacitors are essentially tiny cans filled with a liquid or gel electrolyte. Over several decades, the seals on these cans dry out. As the electrolyte evaporates, the capacitor loses its ability to store energy, a measurement known as capacitance. More importantly, its internal resistance - known as Equivalent Series Resistance or ESR - begins to climb. When ESR goes up, the capacitor generates more heat and becomes less efficient at filtering out noise. In a power supply, this manifests as a persistent 60Hz hum that muddies the background of your music.
In the signal path, failing capacitors act like a filter you never asked for. They can cause a significant roll-off in low frequency response, making your high end sound thin or brittle. You might also notice an imbalance between the left and right channels. If one side of your Pioneer SX-1250 sounds slightly muffled compared to the other, there is a high probability that a coupling capacitor has drifted far out of its original spec. This is why we don’t just replace the ones that look “leaky” or “bulged.” By the time a capacitor shows physical signs of failure, it has been electrically dead for years.
When you decide to recap a vintage amplifier or receiver, you are restoring the electrical stability of the entire system. New capacitors have much tighter tolerances and lower ESR than even the best components available in the 1970s. This results in a lower noise floor and a faster “transient response.” When the music calls for a sudden, sharp drum hit, a freshly recapped power supply can deliver that current instantly, whereas an old, tired supply will sag, resulting in soft, mushy percussion. If you have already followed our Vintage Integrated Amplifier Buying Guide and secured a classic unit, recapping is your next mandatory step.
Essential Tools for a Professional Recapping Project
You cannot do this job with a cheap, 15 dollar soldering stick from the hardware store. Those irons lack temperature control and will either stay too cold to melt old leaded solder or get so hot they lift the delicate copper traces right off the vintage circuit board. To do this right, you need a dedicated station. I highly recommend the Hakko FX-888DX digital soldering station. It provides consistent heat and allows you to dial in the exact temperature needed for different parts of the board. For most vintage boards, 350 degrees Celsius is the sweet spot.
Beyond the iron, your most important diagnostic tool is a high quality digital multimeter. You need to verify voltages and check for continuity throughout the process. It is incredibly accurate and, more importantly, it is fast. When you are checking for DC offset at the speaker terminals, you want a meter that settles on a reading immediately so you can make precise adjustments to the trim pots.
You will also need desoldering tools. A manual solder sucker (like the Engineer SS-02) is great for large joints, but for smaller components, high quality solder wick is indispensable. Do not forget a pair of flush cutters to trim the leads of your new capacitors once they are installed. Finally, keep a bottle of 99 percent isopropyl alcohol and some cotton swabs nearby. After you finish soldering a board, you must clean off the flux residue. Leftover flux is acidic and can eventually corrode the new joints you just worked so hard to create.
Sourcing the Right Replacement Capacitors
When you open up a receiver like a Marantz 2245, you will see dozens of capacitors of various sizes. Your goal is to match the capacitance (measured in microfarads or uF) exactly, while meeting or exceeding the voltage rating (V). For example, if the original is a 100uF 25V capacitor, you must replace it with a 100uF unit. You can use a 35V or 50V replacement without issue, but you should never go lower than the original voltage. Higher voltage ratings simply mean the capacitor can handle more stress, though they are often physically larger, so ensure they will still fit on the board.
For general purpose replacements on the various circuit boards, the Nichicon Muse FG Fine Gold Audio-Grade Capacitors provides a fantastic range of the most common values you will encounter. Having a kit like this on your bench saves you from having to place a separate order every time you find a rogue value during a teardown. However, for the large “main filter” capacitors in the power supply, you will likely need to order specific high-capacitance units from a dedicated electronics supplier like Mouser or Digi-Key.
Stick to reputable Japanese brands like Nichicon, Panasonic, and United Chemi-Con. Within those brands, look for specific “audio grade” series. Nichicon Muse or Fine Gold series are favorites among audiophiles for the signal path, while Panasonic FC or FM series are excellent for power supply filtering due to their high temperature ratings and low ESR. Avoid “no-name” capacitor brands found on auction sites; the cost savings are negligible compared to the risk of a premature failure that could ruin your entire amplifier.
Capacitor Selection Framework
| Capacitor Location | Priority Metric | Recommended Series |
|---|---|---|
| Power Supply (Main Filters) | Ripple Current / Longevity | Nichicon KG, Panasonic THA |
| Power Supply (Local Decoupling) | Low ESR / High Temp | Panasonic FC, Nichicon PW |
| Signal Path (Coupling) | Audio Fidelity / Low Noise | Nichicon Muse, Elna Silmic II |
| Phono Stage | Ultra-Low Leakage | Nichicon KL, WIMA Film Caps |
The Step-by-Step How to Recap a Vintage Amplifier or Receiver
SAFETY WARNING: Amplifiers contain large capacitors that can hold a lethal electrical charge even after the unit has been unplugged. Before touching anything inside, unplug the unit and use a Multimeter to check the voltage across the main filter capacitors. If they show more than a few volts, discharge them using a high-wattage resistor (around 1k ohm 5W) held with insulated pliers across the terminals. Never short them with a screwdriver, as the resulting spark can damage the unit or cause injury.
Once the unit is safe, start by documenting everything. Take high resolution photos of every board from multiple angles. Manufacturers often printed polarity markings on the circuit boards, but they are occasionally wrong. You need to know exactly which way the “stripe” (the negative lead) on the original capacitor was facing. I prefer to work one board at a time, such as the phono preamp board or the driver board, rather than stripping the whole unit at once. This makes troubleshooting much easier if the unit fails to power up later.
To remove a capacitor, apply a small amount of fresh solder to the existing joint. This helps conduct heat and makes the old, brittle solder flow again. Use your desoldering pump or wick to remove the solder, then gently rock the capacitor out of the holes. If the leads are bent over against the board, use a small flathead screwdriver to straighten them while the solder is molten. Be extremely careful not to pull hard; if the solder is not completely melted, you will rip the copper pad right off the board, necessitating a messy “bodge wire” repair.
When installing the new capacitor, double check the polarity. Most electrolytic capacitors are polarized, meaning they have a positive and a negative side. The negative side is marked with a stripe on the body and has a shorter lead. Insert the leads through the holes, pull the capacitor flush to the board (or leave a tiny gap for heat dissipation if it is near a hot resistor), and bend the leads slightly to hold it in place. Solder the leads quickly to avoid overheating the new component, then trim the excess wire. After completing a board, I recommend a “dim bulb tester” power-up to ensure there are no shorts before moving to the next section.
Identifying Polarity and Reading Circuit Boards
One of the most common pitfalls in a recapping project is relying solely on the markings printed on the PCB. In the 1970s, silkscreening processes weren’t always perfect. I have seen Sansui and Pioneer boards where the “+” symbol was printed on the wrong side of the hole. This is why your “before” photos are your most valuable asset. Always orient the new capacitor exactly the same way the factory installed the original, unless you have confirmed via a service manual that the original was installed incorrectly (which is rare but does happen).
You also need to be aware of “non-polar” (NP) or “bipolar” (BP) electrolytic capacitors. These do not have a negative stripe and are often used in speaker crossover networks or specific sections of the signal path where the voltage alternates. You cannot replace a non-polar capacitor with a standard polarized one; doing so will lead to immediate failure and potential smoke. If you see “NP” or “BP” printed on the capacitor body, you must source a matching non-polar replacement.
While you are inside the unit, take the opportunity to look for other failing components. Small signal transistors with tarnished “black legs” are notorious for causing popping and crackling noises in vintage gear. Similarly, look for “death capacitors” - large ceramic or film capacitors connected across the power switch or mains input. These should be replaced with modern safety-rated “XY” capacitors to prevent the chassis from becoming electrically live in the event of a failure. If your controls are also scratchy, this is the perfect time to learn How to Clean Vintage Amp Controls and Switches while the boards are accessible.
Troubleshooting and Post-Recap Testing
After you have replaced the capacitors, the job is not finished. You must verify that the amplifier is operating within its original design parameters. This involves two critical adjustments: DC Offset and Bias (or Idle Current). DC Offset is the amount of direct current present at the speaker terminals. Ideally, this should be 0mV. Anything above 50mV can be harmful to your speakers, and anything above 100mV indicates a problem in the differential amp stage. Use your Fluke 117 to measure this at the speaker outputs with the volume at zero and no speakers connected.
Bias adjustment is even more critical. This sets the amount of current flowing through the output transistors when the amp is at rest. If the bias is too low, you get crossover distortion, which sounds harsh and thin. If it is too high, the transistors will overheat and eventually burn out. You will need the service manual for your specific model to find the correct test points and the target millivolt reading. Use a plastic adjustment tool to turn the trim pots, as a metal screwdriver can slip and cause a catastrophic short between the pot and the chassis.
If you power the unit on and hear a loud hum or see smoke, turn it off immediately. The most likely culprit is a capacitor installed backwards or a “solder bridge” where a blob of solder is touching two adjacent traces. This is why we use a dim bulb tester - a simple series circuit with an incandescent light bulb. If there is a short, the bulb will glow brightly, limiting the current and saving your transistors from destruction. If the bulb glows then dims down, it means the capacitors are charging normally and the circuit is likely safe to test at full mains voltage.
Common Mistakes to Avoid
The biggest mistake beginners make is “shotgunning” the entire unit at once. It is tempting to spend a Saturday afternoon replacing every single component, but if the amp doesn’t work when you plug it back in, you have no way of knowing where the error occurred. By working board-by-board and testing the unit in between, you narrow down the variables. If the amp worked after the power supply recap but hums after the tone control recap, you know exactly which board contains the mistake.
Another frequent error is using the wrong solder. You must use leaded solder (60/40 or 63/37) for vintage HiFi restoration. Modern lead-free solder has a much higher melting point and does not “wet” the old traces well, leading to cold solder joints that will eventually crack and fail. Additionally, lead-free solder is much harder to remove if you need to fix a mistake later. Stick to a high quality, rosin-core leaded solder for the best results and the least amount of stress on the vintage PCB.
Finally, do not ignore the “glue” problem. Many manufacturers in the late 70s and early 80s used a chemically unstable adhesive to secure large capacitors to the boards. Over time, this glue becomes conductive and corrosive, eating through component leads and traces. If you see a brownish, crusty substance around the base of the large capacitors, you must scrape it all off. Use a plastic tool and some alcohol to clean the board down to the green solder mask before installing your new parts.
FAQ
Can I upgrade the capacitance values for better bass?
While it is a common “mod” to increase the value of the main filter capacitors, you should do so with caution. Increasing the capacitance by 20 to 30 percent is generally safe and can provide a bit more “headroom” for low frequency transients. However, if you go too large, you risk damaging the bridge rectifier. Larger capacitors require a much higher “inrush current” when you first flip the power switch. This sudden surge can blow fuses or fry the diodes in the power supply. Stick to the original values unless you are experienced enough to calculate the surge current limits of your rectifier.
Do I need to replace film or ceramic capacitors too?
Generally, no. Film capacitors (like the colorful “drops” or “blocks”) and ceramic disc capacitors are much more stable than electrolytics. They do not contain liquid electrolyte and rarely drift out of spec even after 50 years. The only exception is if a specific type is known to be problematic, such as the “Type VD” varistors found in some Sansui units or the “RIFA” brand safety caps that are prone to cracking and smoking. Unless you have a specific reason to suspect a film cap is failing, leave them alone. Replacing them with modern equivalents rarely results in a noticeable sonic improvement.
How do I know if my soldering iron is the right temperature?
The solder should melt almost instantly when it touches the iron tip and the component lead simultaneously. If you have to hold the iron on the joint for more than three seconds, your temperature is too low or your tip is dirty. Conversely, if the flux sizzles violently and the solder turns dull and grey immediately, your iron is too hot. A controlled temperature station like the Hakko FX-888D takes the guesswork out of this. You want the solder to flow smoothly and leave a shiny, concave “fillet” around the lead. A dull or “blobby” joint is a sign of a cold solder joint that will eventually cause intermittent audio dropouts.
Conclusion
Recapping a vintage amplifier is the single most effective way to ensure your audio system survives another forty years of service. It is a meticulous process that rewards precision and punishes haste. By replacing those tired, dried out electrolytic capacitors with high quality modern components, you are not just fixing a machine; you are restoring a piece of engineering history to its former glory. Once you hear the restored clarity, the silent background, and the punchy dynamics of a freshly recapped receiver, you will never want to listen to an “all original” unit again. Grab your soldering iron, take your time, and enjoy the process of bringing your music back to life.
If you found this guide helpful, consider bookmarking it for your next project or sharing it with a fellow audio enthusiast.